
You can create an AI cartoon image in six practical steps: open the image studio, choose a visual style, describe the subject or add a reference image, generate a result, review what worked, and make one focused edit. If you want the same original character in another scene, use a saved character as a reference instead of describing that character again from memory.
This guide follows the real image workflow in AI Cartoon Generator's Cartoon Photo Generator. It covers three useful starting points—text, a photo, and a saved character—and shows when to regenerate, when to edit, and how to avoid the vague prompts that make cartoon images feel generic.
What Can You Use to Create an AI Cartoon Image?
An AI cartoon image can begin with one of three inputs. The right choice depends on what you already have and what needs to stay consistent.
| Starting point | Use it when | What you control |
|---|---|---|
| Text prompt | You have an idea but no source image | Subject, action, setting, composition, and visual details |
| Photo or image reference | You want to preserve a pose, person, pet, object, or layout | Which source details should remain and what should change |
| Saved character | You want an original character to appear in another image | Character identity plus the new scene, action, or expression |
Text-to-image gives you the most freedom. A reference image gives the model more visual structure. A saved character is the better starting point when identity matters across multiple images.
These inputs can also work together. For example, you can choose a saved character and describe a new setting in text. What matters is assigning each input one job: the reference anchors identity or composition, while the prompt explains the new scene.
If your only goal is to stylize an existing portrait, use the focused photo-to-cartoon workflow and read our guide on how to make a cartoon from a photo. The workflow below is broader: it also covers original scenes, edits, and reusable characters.
How to Create AI Cartoon Images Step by Step
1. Open the image studio
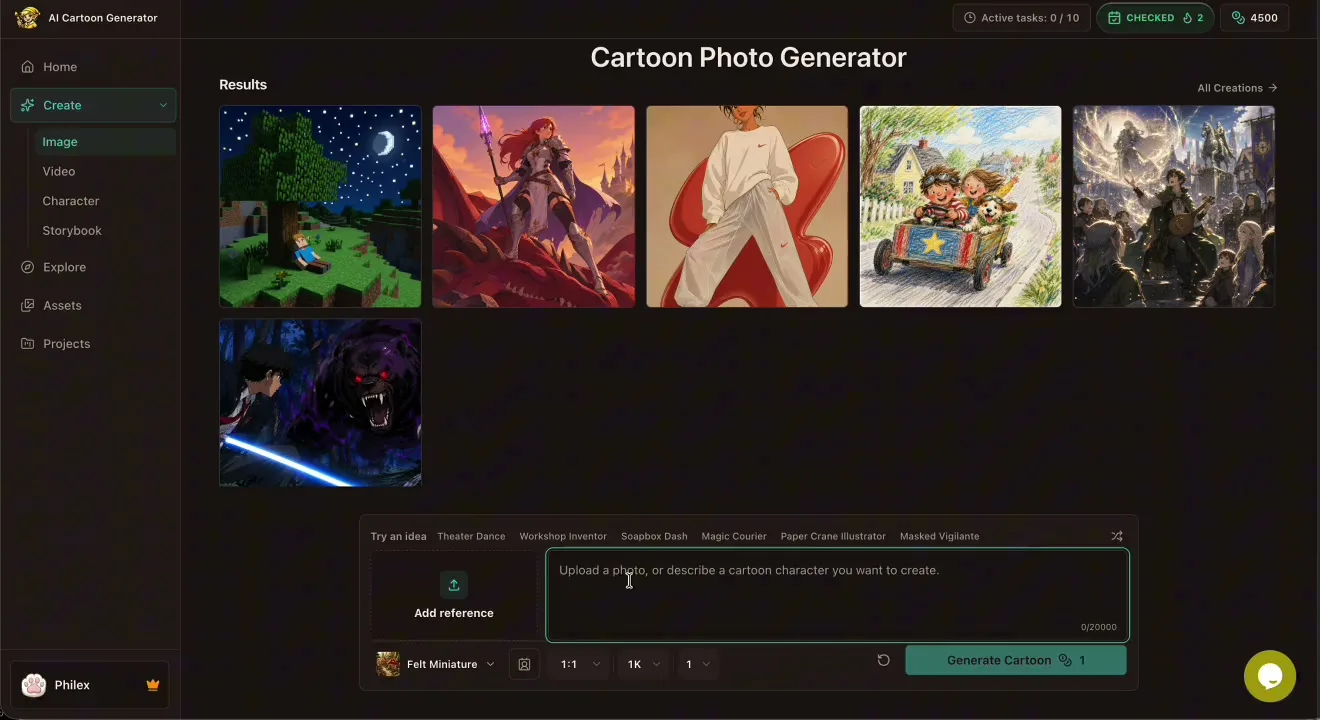
Open the Cartoon Photo Generator and select Image in the Create section. The image studio keeps your recent results above the generation controls, so you can compare a new output with images you already made without leaving the workspace.
Before entering a prompt, decide what the image is for. A square profile image, a landscape blog illustration, and a portrait character design need different compositions. Choosing the purpose first prevents a common mistake: creating a strong subject in the wrong frame and trying to rescue it with cropping later.
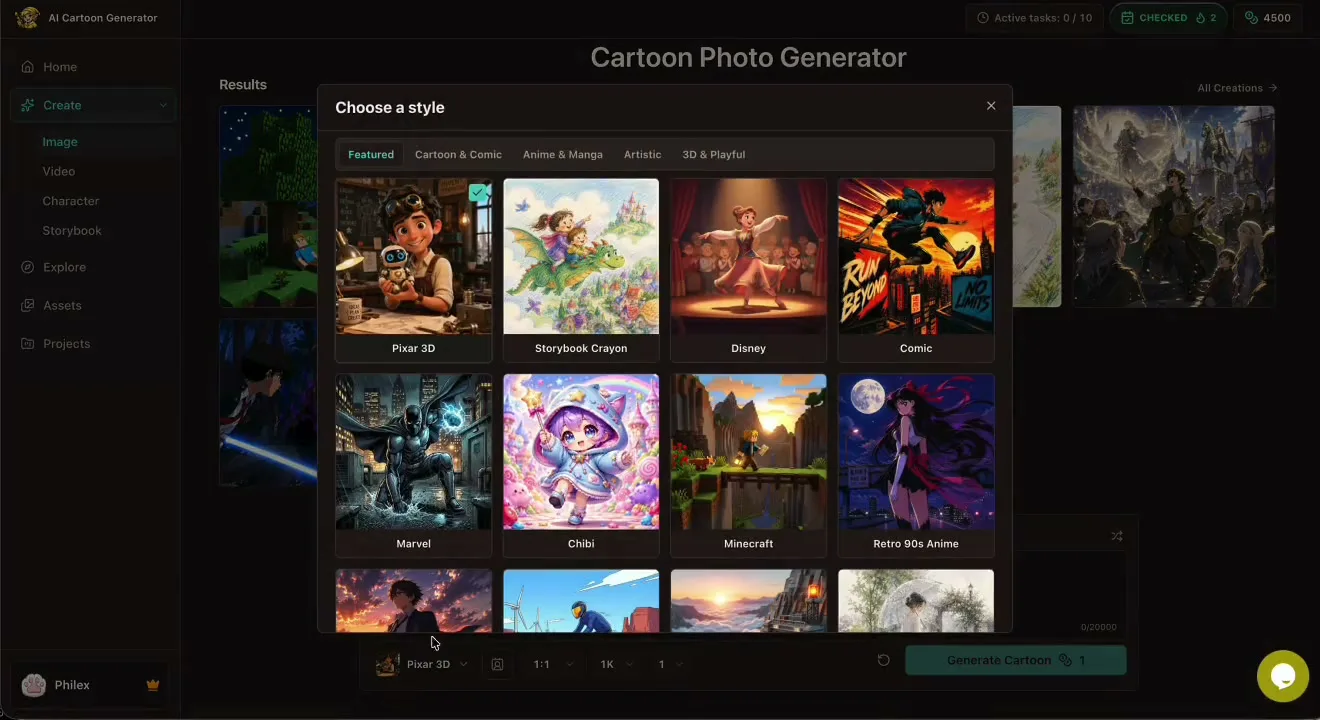
2. Choose one cartoon style
A style preset sets the visual direction for line work, shape language, materials, color, and rendering. Start with one style that fits the job instead of writing several competing style names into the prompt.
For example:
- use a dimensional 3D style for expressive characters and cinematic lighting;
- use anime for clean character-focused illustration and dramatic framing;
- use a comic or graphic style for bold shapes and high contrast;
- use crayon, felt, clay, or paper-inspired styles when the material itself should be visible;
- use pixel art when the final image needs a deliberate game-like grid.
Style and subject are separate decisions. In AI Cartoon Generator, the selected preset supplies the style direction, so your prompt can stay focused on what should appear in the image. This is more reliable than repeating style adjectives while leaving the subject unclear.
3. Describe the image or add a reference
For text-to-image, write one compact prompt that answers five questions:
- Who or what is the subject?
- What is the subject doing?
- Where does the scene take place?
- Which details must be visible?
- How should the scene be framed?
Use this reusable formula:
[subject] + [action or pose] + [setting] + [important visual details] + [composition]Here is a clear example:
A small astronaut tending a moon garden, kneeling beside orange flowers and
holding a silver watering can, glass greenhouse in the background, Earth above
the horizon, full scene with the astronaut as the clear focal point.
The prompt names one subject, one action, one setting, a few visible details, and a composition. It does not add empty quality words such as “amazing,” “masterpiece,” or “perfect.” Everyday language is enough; Adobe's official AI art prompt guide likewise explains that prompts are written descriptions and can be refined with concrete detail.
If you add a photo or image reference, do not repeat everything the model can already see. Tell it what to preserve and what to change:
Keep the person's face, glasses, and seated pose. Replace the office with a
quiet train compartment and add a red travel notebook on the table.
Reference inputs are useful because image generation systems can process visual details as well as text. The OpenAI image generation documentation, for example, describes both image inputs and edit workflows. The exact controls differ by tool, but the principle is stable: use the image for visual facts and the prompt for your requested change.
4. Set the frame, then generate
Choose an aspect ratio that matches the destination before you generate:
- 1:1 for avatars, product tiles, and social posts;
- portrait for character art, posters, and phone-first content;
- landscape for scenes, article covers, presentations, and video starting frames.
Then check the full request once. Is the subject obvious? Is there one readable action? Does the requested composition fit the selected ratio? If so, generate the image.
Do not treat the first result as a final verdict on the idea. Generation includes variation, so the first output is evidence: it shows how the model interpreted your subject, prompt, reference, and style together.
5. Review the result with a short checklist
Review the output in this order:
- Subject: Is the correct person, character, animal, or object present?
- Composition: Is the main subject large enough and placed where you expected?
- Action: Can you understand what is happening at a glance?
- Identity: If you used a reference, are the important traits still recognizable?
- Details: Are props, hands, text-like marks, and background objects usable?
- Style: Does the rendering match the preset you selected?
This order matters. A beautifully rendered image with the wrong action is not fixed by changing the color palette. Identify the highest-level failure first.
If the entire scene is wrong, revise the prompt and generate again. If the scene works and only one part needs correction, use an edit. That distinction saves time and reduces the chance of losing everything that already works.
Also decide what “finished” means before you begin a long sequence of variations. For a profile image, recognizable features and a clean small-size silhouette may matter more than background detail. For a Storybook scene, readable action and space for narration may matter more than tiny textures. Stop when the image meets its actual job, not when every new generation is merely different.
6. Make one focused edit
An edit request should say what remains fixed and describe one meaningful change. In the real tutorial workflow, the generated astronaut garden is refined with a request like this:
Keep the same astronaut and moon garden. Add a tiny blue watering can to the
astronaut's hand and place a small friendly robot beside the flower bed.
“Keep the same astronaut and moon garden” protects the successful parts. The second sentence names the new details. This is clearer than rewriting the original prompt and hoping the whole image returns unchanged.
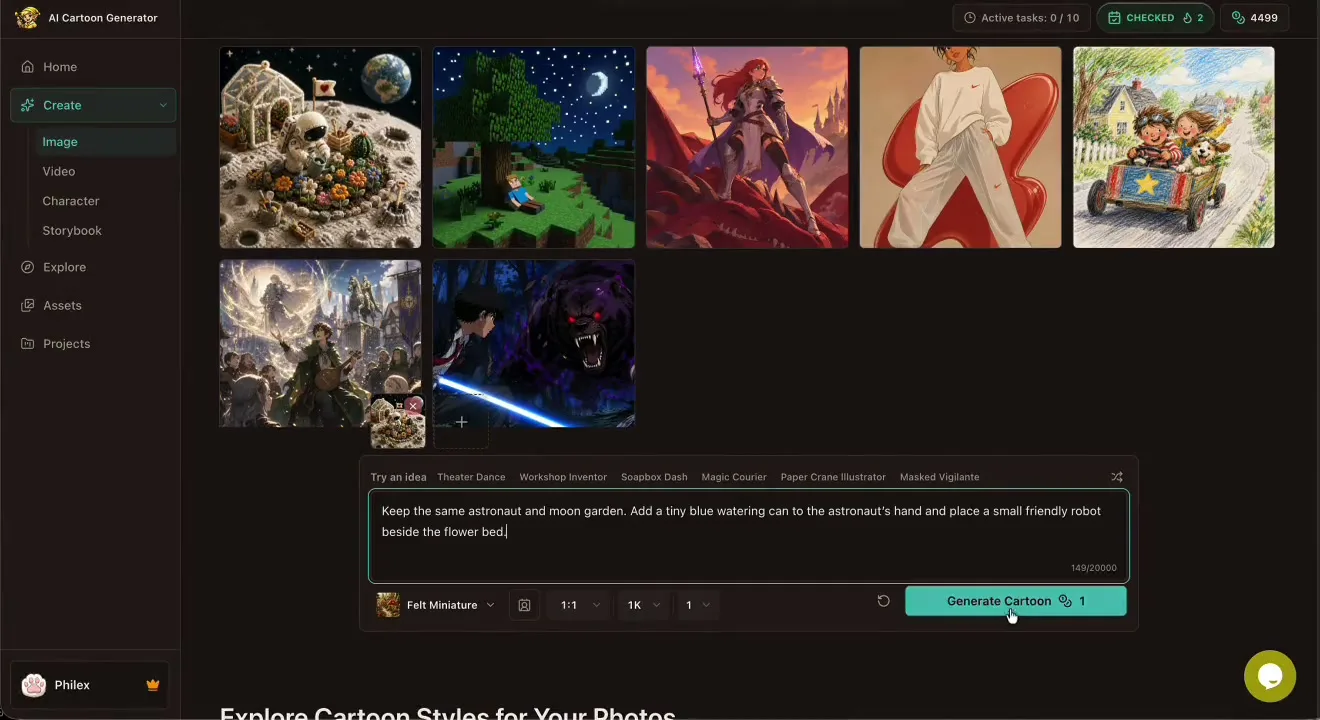
For a second edit, change a different single variable. Large bundles of edits—new pose, new camera, new clothes, new setting, and new lighting at once—make it difficult to tell which instruction caused drift.
When Should You Regenerate Instead of Edit?
Use regenerate when the foundation is wrong:
- the wrong subject dominates the frame;
- the camera angle or aspect ratio does not fit the use case;
- the action is unreadable;
- the selected style is not the direction you want;
- the reference image was unsuitable.
Use edit when the foundation is right:
- add, remove, or replace one prop;
- adjust one color or clothing detail;
- simplify part of the background;
- change a facial expression;
- correct a small scene detail while preserving the subject.
A useful rule is: regenerate the composition, edit the details. It is not absolute, but it gives beginners a clear decision point.
How to Reuse a Saved Character in a New Image
Prompt-only character descriptions can drift. Hair shape, clothing, proportions, and facial features may change when you rewrite the character from scratch in every scene. If the character is part of a series, first build and save it with the AI cartoon character generator.
Then return to the image studio, choose the saved character as a reference, and describe only the new image. For example:
The Forest Red Panda repairs a tiny lantern outside a mountain cabin at dusk,
tools arranged on a wooden bench, medium-wide composition.
The saved reference carries the character identity. The prompt carries the new action, setting, and framing.
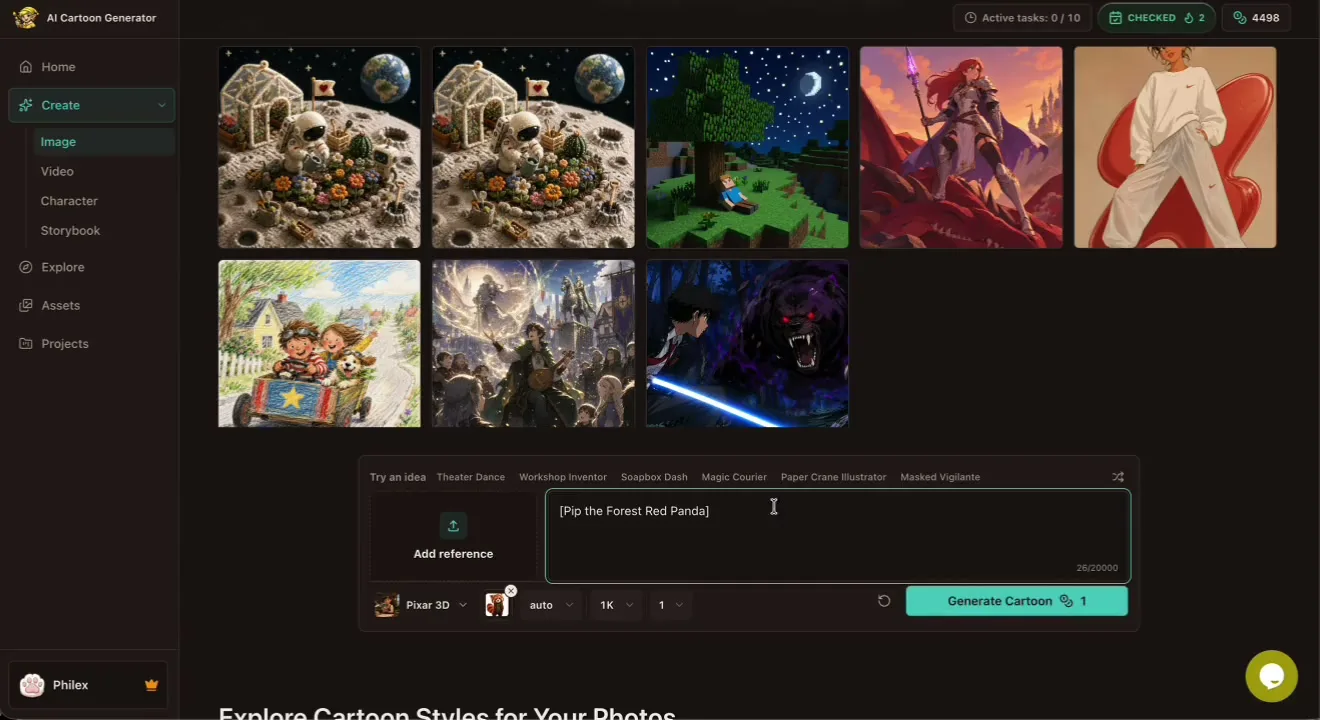
This is a stronger workflow for recurring mascots, Storybook protagonists, and connected social posts. After approving the still image, you can also use it as a visual starting point in the AI cartoon video generator or develop the character across pages with the AI Storybook generator.
Five Common AI Cartoon Image Mistakes
Mixing several style directions
“3D anime watercolor comic vector” does not give the model a clear target. Choose one preset, then describe the subject and scene.
Asking for too many actions
A single still image should communicate one main moment. “Running, waving, opening a door, and looking back” forces several moments into one frame. Choose the most important action.
Leaving the composition implicit
If you need a full-body character, close-up avatar, overhead scene, or wide establishing shot, say so. Aspect ratio defines the canvas; composition defines how the subject uses it.
Changing everything after one weak output
When you change the prompt, style, ratio, reference, and model together, you learn nothing from the next result. Change the variable most likely to fix the problem.
Using reference images without checking rights
Upload images you created, own, or have permission to use. If you work with openly licensed material, read the exact license and follow its attribution and reuse conditions; Creative Commons provides an overview of its six license types.
A Note on AI Images and Copyright
Commercial permission from a tool and copyright protection are not the same question. Tool terms, your rights to input material, local law, and the amount of human authorship can all matter.
The U.S. Copyright Office's AI initiative and reports explain that copyrightability depends on human-authored expression. Its 2025 report also discusses how human selection, arrangement, and sufficiently creative modification of AI-generated material may be protectable, even when AI-generated elements alone are not.
That is one more reason to treat generation as the start of a creative workflow. Select deliberately, edit, combine, write, arrange, and document your decisions. For commercial work or recognizable third-party characters, get advice that fits your jurisdiction and use case.
Frequently Asked Questions
Can AI create a cartoon image from words?
Yes. A text-to-image generator can turn a written description into a cartoon scene. Describe the subject, action, setting, important details, and composition, then choose one style and an appropriate aspect ratio.
Can I turn a photo into a cartoon with the same workflow?
Yes. Add the photo as a reference and explain what should remain and what should change. Use a clear, well-lit image with the main subject visible. For a dedicated portrait workflow, start with the photo-to-cartoon generator.
What makes a good AI cartoon prompt?
A good prompt is specific enough to reduce guessing but short enough to keep one clear scene. Include one main subject, one action, the setting, important visible details, and the intended framing. Let the selected style preset handle the style direction.
How do I keep the same cartoon character across images?
Create and save the character first, then select that saved character as the reference for each new image. Keep the reference constant and change the scene prompt one variable at a time.
Should I regenerate or edit a weak result?
Regenerate when the subject, action, composition, ratio, or overall style is wrong. Edit when the image already works and you only need to change one part, such as a prop, expression, color, or background detail.
Do I need drawing skills to create AI cartoon images?
No. You need to describe and evaluate visual decisions, but you do not need to draw the image by hand. Start with a simple prompt, review the result using the checklist above, and improve one decision at a time.
Create Your First Image
The most dependable AI cartoon workflow is not “write a perfect prompt.” It is a short loop: choose one style, give the model a clear subject and scene, generate, diagnose the biggest issue, and make one focused change. When a character needs to return, replace repeated descriptions with a saved character reference.
Open the Cartoon Photo Generator, choose whether to start from text, a photo, or a saved character, and create one clearly framed scene. Then use the review checklist before deciding to regenerate or edit.